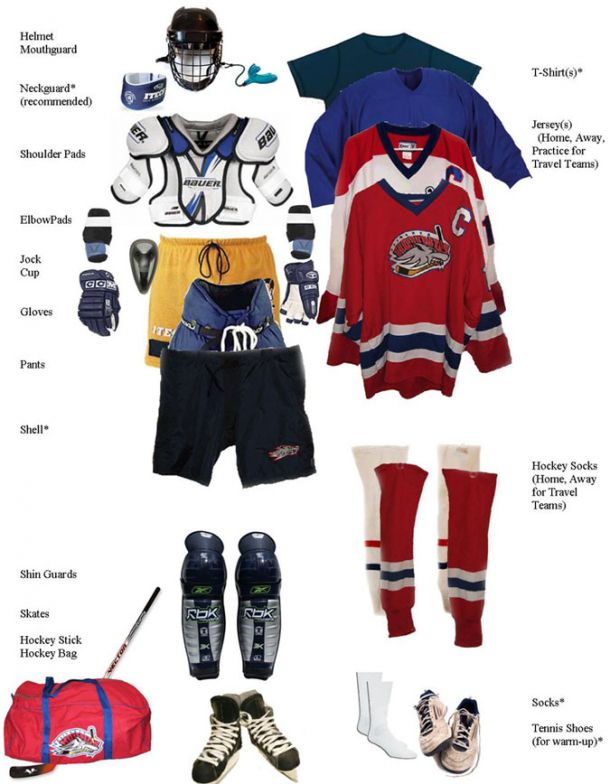
If Itech, Bauer, or Jofa sound foreign to you, feel comforted by the fact that you are not alone. Now that your son or daughter wants to play hockey, these names will become as familiar to you as your pet's. Over half a million youth play hockey in Canada each year and all of their parents had to learn the art of clipping, taping and tying hockey gear.
Your child may be envisioning the Stanley Cup but you are probably envisioning the dent in your checkbook. Outfitting your child for hockey does not have to be a huge expense and there are fewer things cuter than your 5 year old dressed up in full hockey gear! You almost certainly have not gotten to that “photo op” yet because you may have no idea what equipment is needed or how to put it on. If you or your spouse have never played hockey, how would you even know where to start?
Time to Shop
Listed below is a full equipment list for a young player. You can outfit your child with all of the equipment for approximately $300. Anyone could easily spend less or substantially more based on their brand preference and the quality of equipment the plan to purchase.
- Jock / Jill
- Shin pads
- Socks (3 pair)
- Hockey pants
- Shoulder pads
- Elbow pads
- Neck guard
- Jersey
- Skates
- Gloves
- Hockey stick
- Sock tape
- Stick tape
- Hockey bag
Optional Items
- Helmet fix-it kit
- Blister care
- Spare t-shirt & socks
- Rag
- Suspenders
Some companies have compiled beginner sets that include many of the equipment listed above. These sets can be an excellent way to start your shopping but check the quality and fit of the product. If your child is older or larger you may want to find more substantial gear.
A lot of parents find second-hand equipment through the consignment section of their sporting goods store. Second-hand equipment is usually “buyers beware” and equipment like helmets should not be used unless they are CSA (Canadian Standards Association) certified and the helmet hasn't passed its expiration date.
Time to Get Dressed
Are you still unsure of what to do once you do have all the equipment? The list above is organized by dressing order. The first couple of times getting dressed may seem cumbersome and lengthily but with practice it can be accomplished in under five minutes.
To start dressing, your child should only have a shirt (sleeves will become their personal preference), briefs and socks on. Their socks should not be too bulky as that can create friction inside the skate that will lead to blisters. Some players choose to not wear socks and go barefoot in their skates. Jocks or Jills, which provide groin protection, get put on first. Shin pads get strapped on next followed by which ever socks you are going to need. Most players have 3 sets of socks. A practice, “Visitor,” and “Home” set. Most teams have two sets of jerseys so when they play another team with similar colors, one team, usually the visiting team will use a darker jersey. Players should have a set of socks to match these jerseys. The socks will have to be attached to the Jock or Jill by the garter straps or by the velcro. The clear white sock tape wrapped around the outside of the sock and around their calf will help keep everything snug.
The hockey pants go on next. Tip for the parent - If you only want to dress your child once for a game make sure your little player goes to the restroom before you continue. If your child finds the pants a bit too loose you can purchase suspenders. The shoulder pad, elbow pads, neck guard and jersey can all be put on in that order.
The trick to putting on skates is to loosen the laces well and start tightening from the tip of the skate to the top of the skate. Your child and the type of foot they have will determine how tight the skate needs to be. Some players like to have the shin pad and sock pulled over the tongue of the skate and laces. If you find the wax laces hard to work with you can purchase a lace puller or switch to non-waxed laces but those will need replacing more often.
The mouth guard, helmet and gloves are the last to be put on and your little player is set! Their hockey stick should be no taller than the height of their chin with their skates on. The stick can be cut with a hacksaw and should be taped off at the end to hide the rough edge. Most players tape the blade of the stick as well for better control of puck. This will become something your child will most likely spend hours perfecting. Regular hockey bags are smaller and cheaper than the ones with rollers, but if you are envisioning your child carting the gear around, the roller bag might be the wiser purchase.
Time to Play
Skates need to be sharpened regularly. The length of time between sharpening is personal preference, but a parent can tell if a skate is dull by scraping the top of their fingernail over an edge. If the blade does not scrape the nail it is definitely time for sharpening. Most arenas and local hockey shops have skate sharpening services for a nominal fee.
There are some items that are not necessary equipment but are handy to have in the hockey bag. A rag to dry your skates will help prevent rust and skate guards will protect the blades and your other equipment. A helmet fix-it kit is a good emergency precaution, as helmet screws and straps do go missing and your child will not be able to take to the ice without the repairs.
All of the equipment and registration fees may seem costly but when you have seen your child’s enthusiastic grin after they have made a play, you will know it’s money well spent. Now that you are #1 cheerleader and fan, it’s time to get your mandatory gear. A good travel mug, a nice warm seat blanket, your camera, and noisemakers are must-haves for the arena. So rest up, you have got early morning games, thousands of miles of driving ahead and a lot of photo opportunities to look forward to.
Tips - F.Y.I
A great way for your child to get used to dressing and moving in the bulky equipment is to practice dressing at home.
Have your child learn to dress himself. Having dad or mom help is important to ensure that the equipment gets put on properly when they start playing, but the day will come when it is their turn to do it alone. That day will come quicker if you have more than one child playing!
Pack a pair of socks and a t-shirt for after the game so your child does not have to wear and you don’t have to smell, sweaty, stinky clothes all the way home.
Lay out the equipment or put it on a “hockey tree” for drying after each use. This is an excellent habit for your player to get into when they are young and it will prolong the life of their equipment.
Buy stick tape in the bulk rolls. If you want to save money, this is the way to do it.

